


It’s pretty easy to take a screenshot on an active desktop. You could use a tool like the snipping tool or go the old fashioned way. You could also install apps that let you take screenshots and even edit them before saving them. The tricky bit about screenshots is that the normal functions do not work once you’re on the login screen or the lock screen.
In this article, I will clearly explain how you can take screenshots of your login screen and lock screen. The screenshot of your lock screen might be a bit simpler than the screenshot of your login screen. Once you read the method thoroughly, it’s quite easy.
How to Take Screenshot of Lock Screen
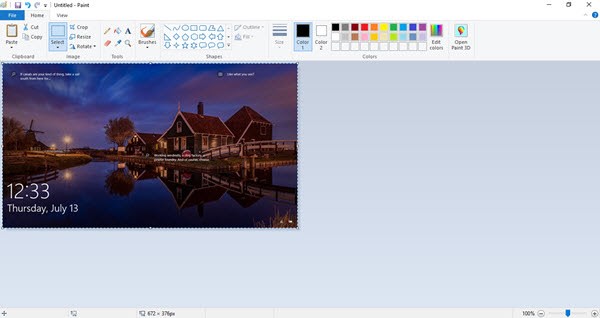
As I mentioned earlier, this is quite simple. Press the Win + L to lock your screen. Once, you’re on the lock screen, press the Print Screen (PrtScr) button as you would on your desktop. This will copy the entire lock screen to the clipboard. Now, unlock your screen and navigate to your desktop. Open any photo editing tool, screenshot app or the Paint app. You can click paste on an empty canvas and you’ll see the screenshot that was earlier copied to the clipboard.
This is quite an easy method, and it’s quite useful.
How to Take Screenshot of Login Screen
So, as I said, this might seem a bit complicated as you cannot use the same PrtScr method as you did above with the Lock Screen. You need to make a few tweaks in the registry.
You might’ve noticed the Ease of Access button on your Login Screen. We’re going to add the Snipping Tool to the Ease of Access button by making a few changes in the registry.
Open the Registry Editor and navigate to the location mentioned below:
HKEY_LOCAL_MACHINE\SOFTWARE\Microsoft\Windows NT\CurrentVersion\Image FileExecution Options
Create a new key on the left panel and a new String Value on the right panel. Name the key as utilman.exe and the string value as Debugger.
Set the path of the snipping tool as the value of the string.
The path of the Snipping Tool is C:\Windows\System32\SnippingTool.exe
Now, navigate back to the Login Screen. Click the Ease of ACcess button on the bottom right corner of the screen. The snipping tool will pop up. You can take the screenshot by choosing a portion that you would like and click the Copy button. This will copy it to the clipboard. Note that you cannot directly save the screenshots like you can when you use the snipping tool on the desktop.
Now, open any photo editing tool, the paint app or any other software that you use and paste the screenshot. You can save it or crop and save it.
Final Thoughts
While you make changes in the registry editor make sure that you double check everything as you could make mistakes. If you want to create and capture videos and pictures for your windows screen then you can also use best Screen Recorder for PC. It’s probably better to reboot your laptop before you try taking a screenshot after making changes in the registry.
Latest posts by Sejal Parmar (see all)
- How to Take Screenshot of Login Screen & Lock Screen on Windows - August 19, 2017
- 10 Best Apps for Android TV - May 19, 2017